Sunday, January 31, 2010

Vintage Valentine for Cuttlebug Challenge #68

Just a short post tonight. I have a bunch of stuff to do before I get to drop into bed. I actually had a little time to create today and I wanted to participate in the Cuttlebug Challenge #68. The mission this week (should you choose to accept it, you have until Tuesday evening for a great prize!) is to make a vintage Valentine. I'm not much of a vintage-type person so this one took me out of my comfort zone but I made it through without too many problems. It did take me a while to decide what I wanted to do with the card.

This is what I came up with. I used a vintage poster from Ringling Brothers Circus of three women aerialists. I added my computer-generated sentiment and used the Fluer de lis shapeablities for a background. I made the checked background using a Gina K stamp set called Ribbon Stripes using my homemade Stamp-a-ma-jig to line up the sections.

Here's the inside of the card using the shapeablilities once again. The sentiment is "Love doesn't make the world go round, love is what makes the ride worthwhile." The sentiment is from Gina K's called Love Notes and the set is free if you buy three other sets this month. (Just passing on a good deal. I an not employed by Gina K.)

Thanks for stopping by. I hope you have a fabulous week ahead. It's back to work tomorrow and to the doctor's office for an arthritis check in the afternoon. Hope to be back really soon with more fun stuff!

Warm winter hugs,

Friday, January 29, 2010

I Just Called to Say I Love You

Happy Friday night, almost Saturday morning! Welcome to the weekend, my favorite time of the week! I made a Valentine tonight. I used a Gina K stamp set designed by Rupa Shevde, Sung from the Heart.

I embossed the black background with the Tartan embossing folder in my Cuttlebug. I cut the image and sentiment with my heart Nestabilities and then embossed it. The ribbon is from Michael's and I tied the bow with my Bow Easy. I added flowers and a brad to embellish.

This card works for two challenges:
  • Clearly iStamp's challenge this week is a color challenge: red, white, black and pink is optional. You have lots of time to try out this challenge so check it out!
Here's to a wonderful weekend for all of you. We are again in the deep freeze and supposed to stay that way all weekend. It's awfully early to be saying this but I am so ready for spring. I'll be back with more eye candy this weekend so stay tuned.

Warm winter hugs,

Thursday, January 28, 2010

Sung From the Heart Blog Hop

Tonight's card is for a blog hop over at Gina K's A Day in the Life blog. She is hosting a blog hop for Rupa Shevde's newest stamp set Sung From the Heart.

My card uses Rupa's new set. I colored the bird with Kooh-i-nor Woodless Pencils and OMS. The bird and background sheets are cut from rectangle Nestabilities alternated with scalloped rectangle Nestabilities. I used one of the tag Spellbinders to cut out the sentiment and added some matching ribbon and also some die cut flourishes. Check out Gina's blog for more ideas with this set and also the Stamp TV gallery. Love your new set, Rupa. Thanks for all the great images and sentiments!

Thanks for stopping by. Tomorrow is Friday and then my favorite part of the week - the weekend! See you then! Have a great Friday!

Happy inking,

Tuesday, January 26, 2010

Heartily Yours Hop

Tonight I am showcasing a new stamp set designed by Nina Brackett. I just love this set. It's called Heartily Yours. Since it arrived at my house from Gina K it's been my go to set. Of course at the moment I am making Valentines, but I think this set will be wonderful for so much more than Valentines.

Isn't the wishing well adorable? Both the image and sentiment are from Heartily Yours. I paper pierced the kraft background layer. The sentiment was stamped and then cut with a heart Nestability, then I added Red Stickles to the heart to make it sparkly. I also added a flower embellishment with a self-adhesive rhinestone. Hope you like my latest creation! You can check out lots more designs for Nina's stamp set at A Day in the Life and Stamp TV.

Check out Nina's blog for a fabulous freebie and a chance to help the Children's Hunger Fund. This is a wonderful chance to help those in need!

This card also works for the Little Paper Shop's card challenge this week. Their challenge is a color challenge: kraft, red, and chocolate. I think these colors go together so well. You have plenty of time to work on this challenge yet so give it a try!

Thanks for stopping by. I'll be back with more from Nina's set. I have lots more ideas swimming in my head. LOL! Hope you have a marvelous Wednesday!

Monday, January 25, 2010

I Stink Your Sweet Tutorial

Over this past weekend I worked on the boxes that I'll give my co-workers for Valentine's Day, filled with something chocolate, of course! And this is the box I showed in an earlier post that I did for a workshop for Girl Scouts. This time I made them in batch.

I thought I'd share the tutorial with you that I did for the workshop. I used one of the images from Stampin' Up!'s Pun Fun. The little skunk is so cute. This time I paper pieced the skunk instead of coloring him like I did in the tutorial.

I orignally found this idea at Beate John's Fresh and Fun blog. Scroll down to December 31, 2009 and you can watch a video of how to make this box. Below is the tutorial I wrote to give to the paticipants of the workshop.

Materials:
  • Red card stock cut 4 1/4 by 6 5/8 inches
  • Scoring Tool
  • 2 pieces of pink card stock: one is 1 by 2 3/8 inches; the other 7/8 by 2 1/8 inches
  • white card stock 1 1/2 inches square
  • Valentine stamps
  • Scalloped punch
  • Glue stick
  • Pop dots
  • Paper cutter or scissors
  • Ruler
Cut the red card stock to 4 1/4 by 6 5/8 inches.


Score at the one inch mark on the long side of the red card stock. Rotate the card stock 180 degrees and score again at the one inch mark.

On the short side of the card stock, score at the two (2) inch, three (3) inch, five (5) inch, and six (6) inch mark.

Cut the corners off as shown in the picture.

Snip the score lines as shown in the picture.

Fold on all the scored lines.

Apply glue to the two inner flaps as shown in the picture.

Press the back flaps of the box into the small glued flaps.

Apply glue and press the front flaps to the back flaps. Your box is made. You can embellish it whatever way you would like.

Scalloped Edge: To decorate the box, cut a piece of pink card stock measuring 1 by 2 3/8 inches. Using a scalloped edge punch, scallop on the long edge. Glue this piece to the underside of the flap.

Top of flap: Cut another piece of pink card stock measuring 7/8 by 2 1/8 inches. Stamp a sentiment on this piece of card stock and glue it to the top of the box flap.

Stamped image: Cut a square of white card stock approximately 1 1/2 inch square. Stamp desired image and color (or paper piece). Trim this stamped image if desired and adhere the square with pop dots glued to the bottom of the square only. Adhere to the box making sure the flap will tuck behind the stamped square.

Fill the box with your favorite sweet treat!

That was probably my longest post ever! Hope you enjoyed my tutorial. If you have any questions don't hesitate to email me. I'm happy to help out. Hope you have a terriffic week. Come back and see me soon!

Warm Winter Hugs,


Saturday, January 23, 2010

Getting Organized for 2010

Happy Saturday, ya'll. Are you following all the blog entries about CHA? Sounds like everyone is having a wonderful time out in CA checking out all the newest craft goodies. Wish I were there. Sounds like such fun!

Today I finished a project that I was working on to send to me son for his birthday. He moved away last June and could never remember when people had a birthday so I made him this organizer to help him remember everyone's birthday's. The first set of pictures are the months and who has a birthday in each of them.

For each month I cut card stock (4 1/8 by 6 1/8) to fit in my little organizer (picture below) and used scraps of patterned paper to decorate the card stock. I printed the month sheets in Word on my computer. If you'd like to have the Word document just email me.

Some months I decorated more then others by using embellishments, but since my organizer is rather thin I couldn't do that on all of them. I used punches and decorative scissors to make the edges more festive. Some are hard to see by the pictures I took.


And last but not least, here is the organizer that I made. You can find the instructions on Stamp TV. Gina K did a video of how to make this box and the template is here. After you go to the freebies page you may have to search for memory Keeper.


So this project is actually for two challenges. The first one is at Kaboodle Blog. Challenge #22 is Anything but a Card challenge. I love stretching my imagination to see what else I can make with paper. The second challenge is from the Making Greeting Cards Yahoo group. The challenge was to use scraps and I do have to say my pile of patterned paper scraps has decreased after this project.

Since my DH is off camping this weekend at the Winter Rendezvous, I have a scrapping weekend. I'm off to see what else I can make. Stay tuned, I'll probably be back with more eye candy this weekend! Hope you're having a wonderful weekend!

Warm winter hugs,

Friday, January 22, 2010

I'm in Lava With You! Nina Brackett's Heartily Yours

Nina Brackett is having a blog hop to celebrate her new stamp set Heartily Yours. You can see all the details here. While you are visiting Nina, check out the free goodies she has. She's also taking donations for The Children's Hunger Fund to help in Haiti. Check out her wonderful stamp set here.

Happy Friday everyone. I hope your Friday was a great start to a wonderful weekend! My card today is for the Caardvarks challenge: Red Hearts. I am totally in love with Basic Grey paper lately. This background paper is from the Lemonade collection


The image and the sentiment come from Gina K stamp set Heartily Yours designed by Nina Brackett. I love this set and all the "punny" sayings. Isn't the lava lamp adorable!? I cut the sentiment and image out with rectangle Nestabilites and then layered it with scalloped Nestabilites. I added the heart border using the smallest heart in the Heart Nestabilities. It turned out to be a great Valentine's Day card. Join in the fun at the Caardvarks challenge. The deadline is February 1st.

Well, the weekend is upon us! We are supposed to be up to 50 degrees tomorrow but they are saying we could get an inch of rain with snow following right behind. Temperature changes like that usually bring out the sickies in people. I hope not. Make your weekend fabulous! Thanks for stopping by.

Warm winter hugs,

Thursday, January 21, 2010

Warm Winter Wishes

My card tonight was done for two challenges. First, the Little Paper Shop's blog challenge is to Button It! So here is my creation using Dovecraft's Winter Wonderland background paper.

The stamp set, Warm Winter Wishes, is designed by Carolyn King. I cut the image and sentiment out with round Nestabilities and then used the Scalloped Round Nestabilities as an accent. The ribbon is Gina K luxury gold-lined ribbon. And of course I added the buttons to "button it up!" I accented the buttons with a little red ribbon too.

The other challenge that I submitted this for was Stamp TV's color challenge. The challenge was to use winter colors. Both challenges are open until Sunday so check them out and play along.

Yeah, it's almost Friday! One more day to the weekend. I hope you've had a good week and that your weekend will be relaxing and cozy. Take care! Thanks for stopping by...

Warm winter hugs,

Tuesday, January 19, 2010

Saturday Workshop

So today I'm sharing the two projects that my friend Julie and I did for a Girl Scout leader workshop last Saturday. The participants did not have to make the projects exactly like I made mine because we had lots of different stamps for them to use. But the colors of the boxes were all the same. I pre-cut the paper and scored a lot of it because we only had an hour to work with. It was not easy getting both projects done in an hour's time. Some participants went over time which wound up being okay since our time slot was during the last one of the day.


This is a little treat box that I cased from Beate's Fresh and Fun blog. You'll need to scroll down to the December 31, 2009 post. I couldn't get it to come up as a direct link. She has a video tutorial of how to make the box. I used Stampin' Up! Pun Fun for my image. We filled the boxes with candy conversation hearts!

Each person got to make one card. I made three to give them an idea of what they could do and we had stamps for birthday, thanks and get well cards. We used the same sketch for all the designs.

It was fun teaching the class but an hour is really difficult to get everything done. But I'd do it again! Thanks for stopping by today! Check back tomorrow and hopefully I'll have more eye candy. I have to make up for the last few weeks when I haven't posted. LOL! Have a great Wednesday!

Warm winter hugs,

Monday, January 18, 2010

In Difficult Times

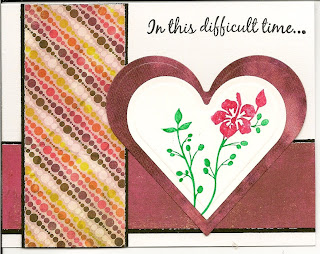
This past week has been busy in many ways. I did two workshops this past Saturday for the Girl Scouts: one on Kitchen Chemistry and one on Stamping. I loved doing both but it takes me weeks to prepare. I'll try to remember to share the projects that we did at the stamp workshop tomorrow. Tonight I needed to make sympathy cards. Of all the cards I make, these are the most important and my least favorite. Within the last two weeks, one of my best friends lost her mother and another friend lost her 24 year old daughter in a gun accident. Such a tragic lose. I needed to send both of them something, so I came up with this card.

I love Basic Grey paper. These two different papers are from the Lemonade and Indian Summer sets of paper. And the image and sentiment is from Gina K's set called Comfort & Peace. I love the sentiments in this set. I cut the heart shapes with my Heart Nestabilities. They are die cut and embossed. I did this card from the sketch challenge at Clearly iStamp. I love this sketch and will definitely use it again. Hopefully for a happy occasion. You have until Thursday to participate so check it out!

This is a short post tonight. I hope to be back tomorrow evening with more. Please take care and don't miss an opportunity to tell someone you love them. I love and so appreciate all of you. Thanks for stopping by today!

Warm hugs,

Tuesday, January 12, 2010

Victoria Case Release: Aurora

Just a quick note to let you know about a chance to win some great stamps. Victoria Case is releasing her Aurora collection on January 15th and you have a chance to win a set before they are released. Check out Victoria's blog for your chance to win. Good luck! Candy ends January 14th at noon (Pacific time).

Sunday, January 10, 2010

Cuttlebug White

I can't believe it's been an entire week since I posted. Time flies. This week has been cold, cold, cold and snow, snow, snow! It was our first significant snowfall of the season and it came down for two straight days. Our schools were out for two days too. And of course work is busy right now and probably will remain that way until mid-February. I have been working on something this week that I will show you a little later. But first, this card I did last night for the Cuttlebug Challenge #65. The challenge is to make a basic white theme with an Asian twist if possible.

My card uses Stampin' Up! Embrace Life stamp set with just a touch of color. I used colored pencils to color them in and a Bow Easy to create the double-looped bow. The background is embossed with the Moroccan Cuttlebug folder (not really Asian but I thought it looked good). I did stamp and color first and then put it through the Cuttlebug. Pretty simple. Head on over the the Cuttlebug Challenge Blog and give this one a whirl. Lots of fun!
Thanks for stopping by today. Hopefully this week will bring more time to create. I feel lost without that. Stay warm and safe out there!

Warm winter hugs,

Sunday, January 3, 2010

Melanie, Part 2

Good Sunday morning! I hope it's warmer where you are. We are at a whooping 6 degrees outside. Needless to say this might be an inside kind of day. The Colts are playing this afternoon so that will be some of my day. Go Colts!

I just wanted to pop in with this card I made last night. You can check out yesterday's post to get the low down on Melanie Muenchinger's big weekend event. You still have time to participate.

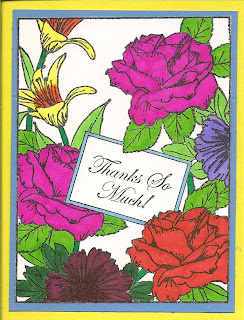
This card uses Melanie's Arranged with Love stamp set. I love flowers and I love this stamp. There are lots of sentiments that can be added into the little tag so it's so useful for lots of different events. It's colored with Sharpie markers and then mounted on blue background card stock with a yellow base. Pretty simple but such a lovely card. Thanks for this set Melanie!

I hope you have a super Sunday. Stay warm! See you soon.

Warm winter hugs,

Saturday, January 2, 2010

Cheers to Melanie Muenchinger!

My first creation of 2010 was to celebrate Melanie! This weekend Melanie Muenchinger is celebrating 2 years of illustrating and 25 stamp sets. Isn't that incredible?! Melanie is so talented. Check our her stamp sets. One of my favorite sets is called Wee Tees. My card uses this stamp set illustrated by Melanie!

I used up some paper scraps to make the background (it isn't actually a resolution for this year because I'm always looking for ways to use scraps). In order to give it the quilt look I added faux stitching using silver and gold gel pens. The image is colored with colored pencils and I added Baby Blue Stickles to the onesie. Just too cute!

Check out Melanie's blog, Hands, Head and Heart, and comment to win one of a bunch of prizes. If you have one of Melanie's sets play along and make your own creation for another chance to win. (I'm hoping that she pulls my name.)

This card was also made for the Clearly iStamp blog challenge. This week's challenge was bradilicious! I used brads in the four corners of the quilt background, baby blue of course! Check out their easy to do challenge this week and get started on your creative ideas for 2010!

Happy 2010 to you all! Hope you have a safe, happy, healthy, and creative new year! Stop back again soon and see what else I've been up to.

Warm winter hugs,

Related Posts Plugin for WordPress, Blogger...